Creating a new asset
The General section of the Assets allows you to create a new asset and add it to your facility. You can create an asset to manage all asset-related functions in your Origin account.
How to create a new asset
-
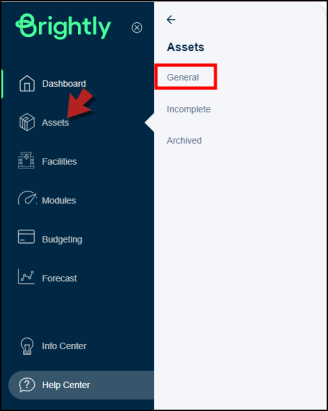
Click on Assets in the left panel, then select General.
-
Click on the +Create Asset button in the top right corner.
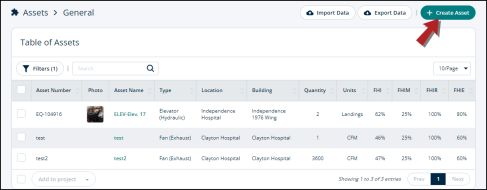
You’ll be directed to a new page divided into different sections to fill out asset information.
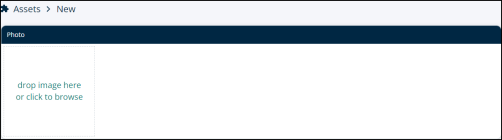
Photo
This section allows you to attach the photo of an asset.
-
You can drag and drop an image. Or
-
You can upload an image from your desktop.
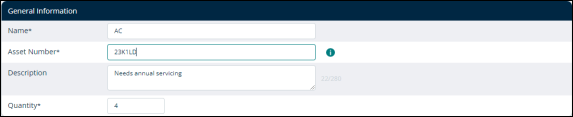
General Information
This section contains the important details about an asset. These details are:
-
Name: Write the name of the asset.
-
Asset Number: Write the asset number containing special characters.
-
Description: Describe the functionality of the asset or provide details like what makes this asset different from the other ones of the same type and category.
-
Quantity: Number of assets.
-
Asset project status: Mark Committed or Non-Committed if you have assigned a project to the asset.
*Note: Fields marked with an asterisk are required.
Labelling
This section allows you to add asset details like make and model. These details include:
-
Manufacturer: The name of the company that manufactured the asset.
-
Model Number: The model number of the asset.
-
Serial Number: The serial number of the asset.
-
QR/Barcode: The QR code of the asset.

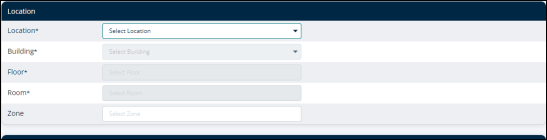
Location
Use this section to define where an asset is located.
This section contains:
-
Location: Select the facility from the Select Location drop-down.
-
Building: Select the building within the facility from the Select Building drop-down.
-
Floor: Choose a floor from the Select Floor drop-down.
-
Room: Choose a room from the Select Room drop-down.
-
Zone: Click on Select Zone drop-down to see the areas where assets are located.
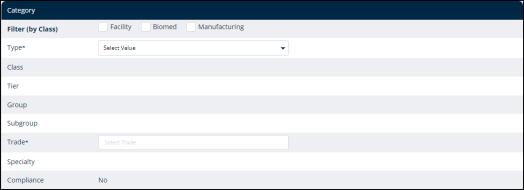
Category
Use this section to define the filters that classify an asset. This includes:
-
Filter (by Class): Here you can check one, two, or all three boxes to define class. The class types are:
-
Facility
-
Biomed
-
Manufacturing
-
-
Type: Click on the Select Value drop-down to identify the type of asset.
-
Class: The class filter will apply here too.
-
Tier: The utility ranking of an asset.
-
Tier Ranking:
-
Tier 1 Assets - Core Utility/Infrastructure Assets
-
Tier 2 Assets - Extended Infrastructure Accessible
-
Tier 3 Assets - Grounds and Structures
-
Tier 4 - High Density Infrastructure Accessible
-
Tier 5 - High Density Infrastructure Inaccessible
-
Modernization/Architectural - By Areas of Same Finish Levels and Vintage
-
BioMed/Clinical Engineering
-
-
-
Group: The group that the asset belongs to. For example, air handling.
-
Subgroup: This is to further customize the assets’ group. Like an air-dryer will fall into the Dryers subgroup.
-
Trade: Click on Select Trade to choose the industry of the asset. For example, plumbing.
-
Specialty: The work that the asset performs. For example, mechanical.
-
Compliance: It refers to assets that need to be included in an industry's compliance category. For example, Healthcare: Life/safety equipment
Lifetime
This section allows you to keep a record of the following:
-
Installation date: You can note the installation date of an asset.
-
FHI useful life: Use this field to note the asset’s FHI value and make a record of its useful life.
-
End of useful life (Adjusted): Make a record of the asset’s useful life if it’s properly maintained.
-
End of useful life (Straightline): Make a record of the asset’s useful life in general.
-
Capital improvement investment: The significant amount subjected to fixing or repairing asset(s) that have been owned for longer than a year.

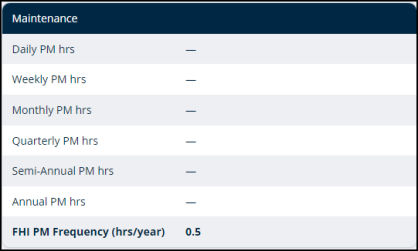
Maintenance
You can use this section to assign maintenance work hours to the asset.
-
Daily PM hrs: You can assign daily preventative/predictive maintenance hours to the asset.
-
Weekly PM hrs: You can assign weekly preventative/predictive maintenance hours to the asset.
-
Monthly PM hrs: You can assign monthly preventative/predictive maintenance hours to the asset.
-
Quarterly PM hrs: You can assign quarterly preventative/predictive maintenance hours to the asset.
-
Semi-Annual PM hrs: You can do a maintenance check after every 8 months.
-
Annual PM hrs: You can do a maintenance check once a year.
-
FHI PM frequency (hrs/year): You can do a maintenance check based on the FHI value of the asset.
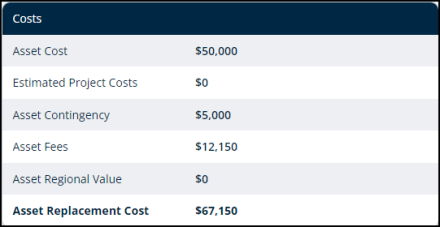
Costs
Use this section to note the cost of the asset that you’re creating. You can enter the following costs:
-
Asset cost: The price of the asset.
-
Estimated projects cost: You can estimate the cost of assigning the asset to a project.
-
Asset contingency: The amount allotted to the asset for any unforeseen crisis.
-
Asset fees: Operating fee.
-
Asset regional value: The price of asset in a particular area.
-
Asset replacement cost: Note down the cost of replacing the asset.
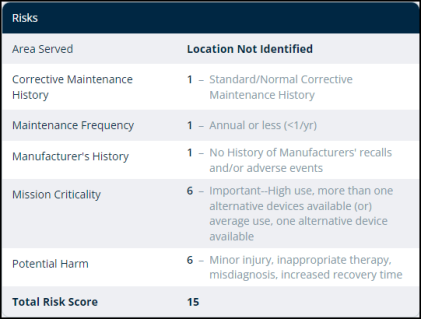
Risks
Use this section to note the area that the asset will be serving.
-
Click on the Area Served drop-down to select the location or department that the asset will be used.
You can identify the risk level by using the information in the following fields:
-
Area served: The area where the asset is used.
-
Maint. Requirement: A score is assigned to determine the level of urgency for repairing the asset.
-
Redundancy: The time for which another asset can take over while this one gets repaired.
-
Risk application: This is to determine the effect of the risk application.
-
Utility classification: If the asset is classified as a part or supporting equipment for another asset.
-
Total risk score: Based on the factors presented above, the total risk score is calculated for the asset.
Custom Asset Attributes
This section allows you to fill in custom details to further distinguish the asset you’re creating.
-
Barcode Number: You can enter the barcode number here.
-
IP Address:

Verification
You can check the box next to Verification needed if the asset was given a conditional assessment, however, it was not verified by a trusted source.
-
You’ll see the Notes field to write down any verifying information.

Save or Cancel
-
After entering the required information, you can save the asset by clicking on theSave button in the bottom right corner.
-
You can also cancel creating this asset and go back to the General section by clicking on Cancel in the bottom left corner.

